Related Posts Plugin for WordPress, Blogger...
Wednesday
Aug032016

Spicy Chicken & Chorizo Paella with Poblano Peppers

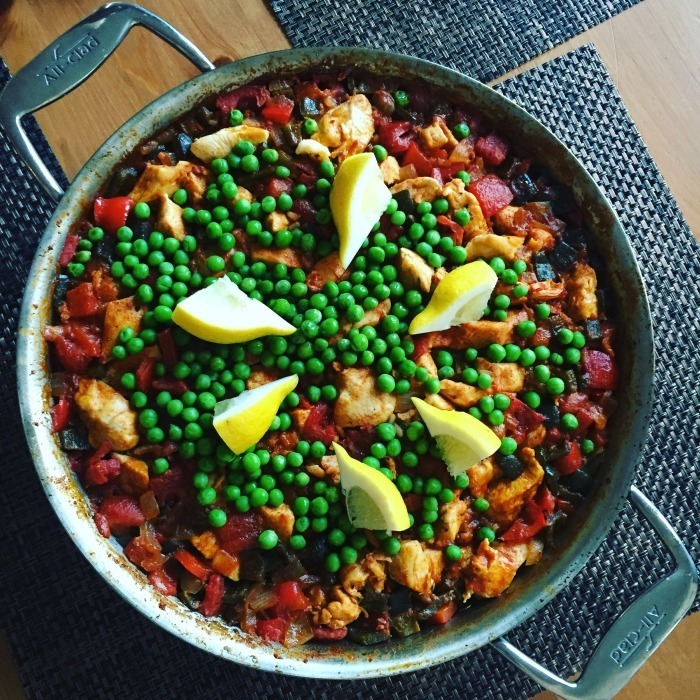
I've had enough requests for this recipe, which to date has lived only my head, such that it's time for a new Hungry Sam post!

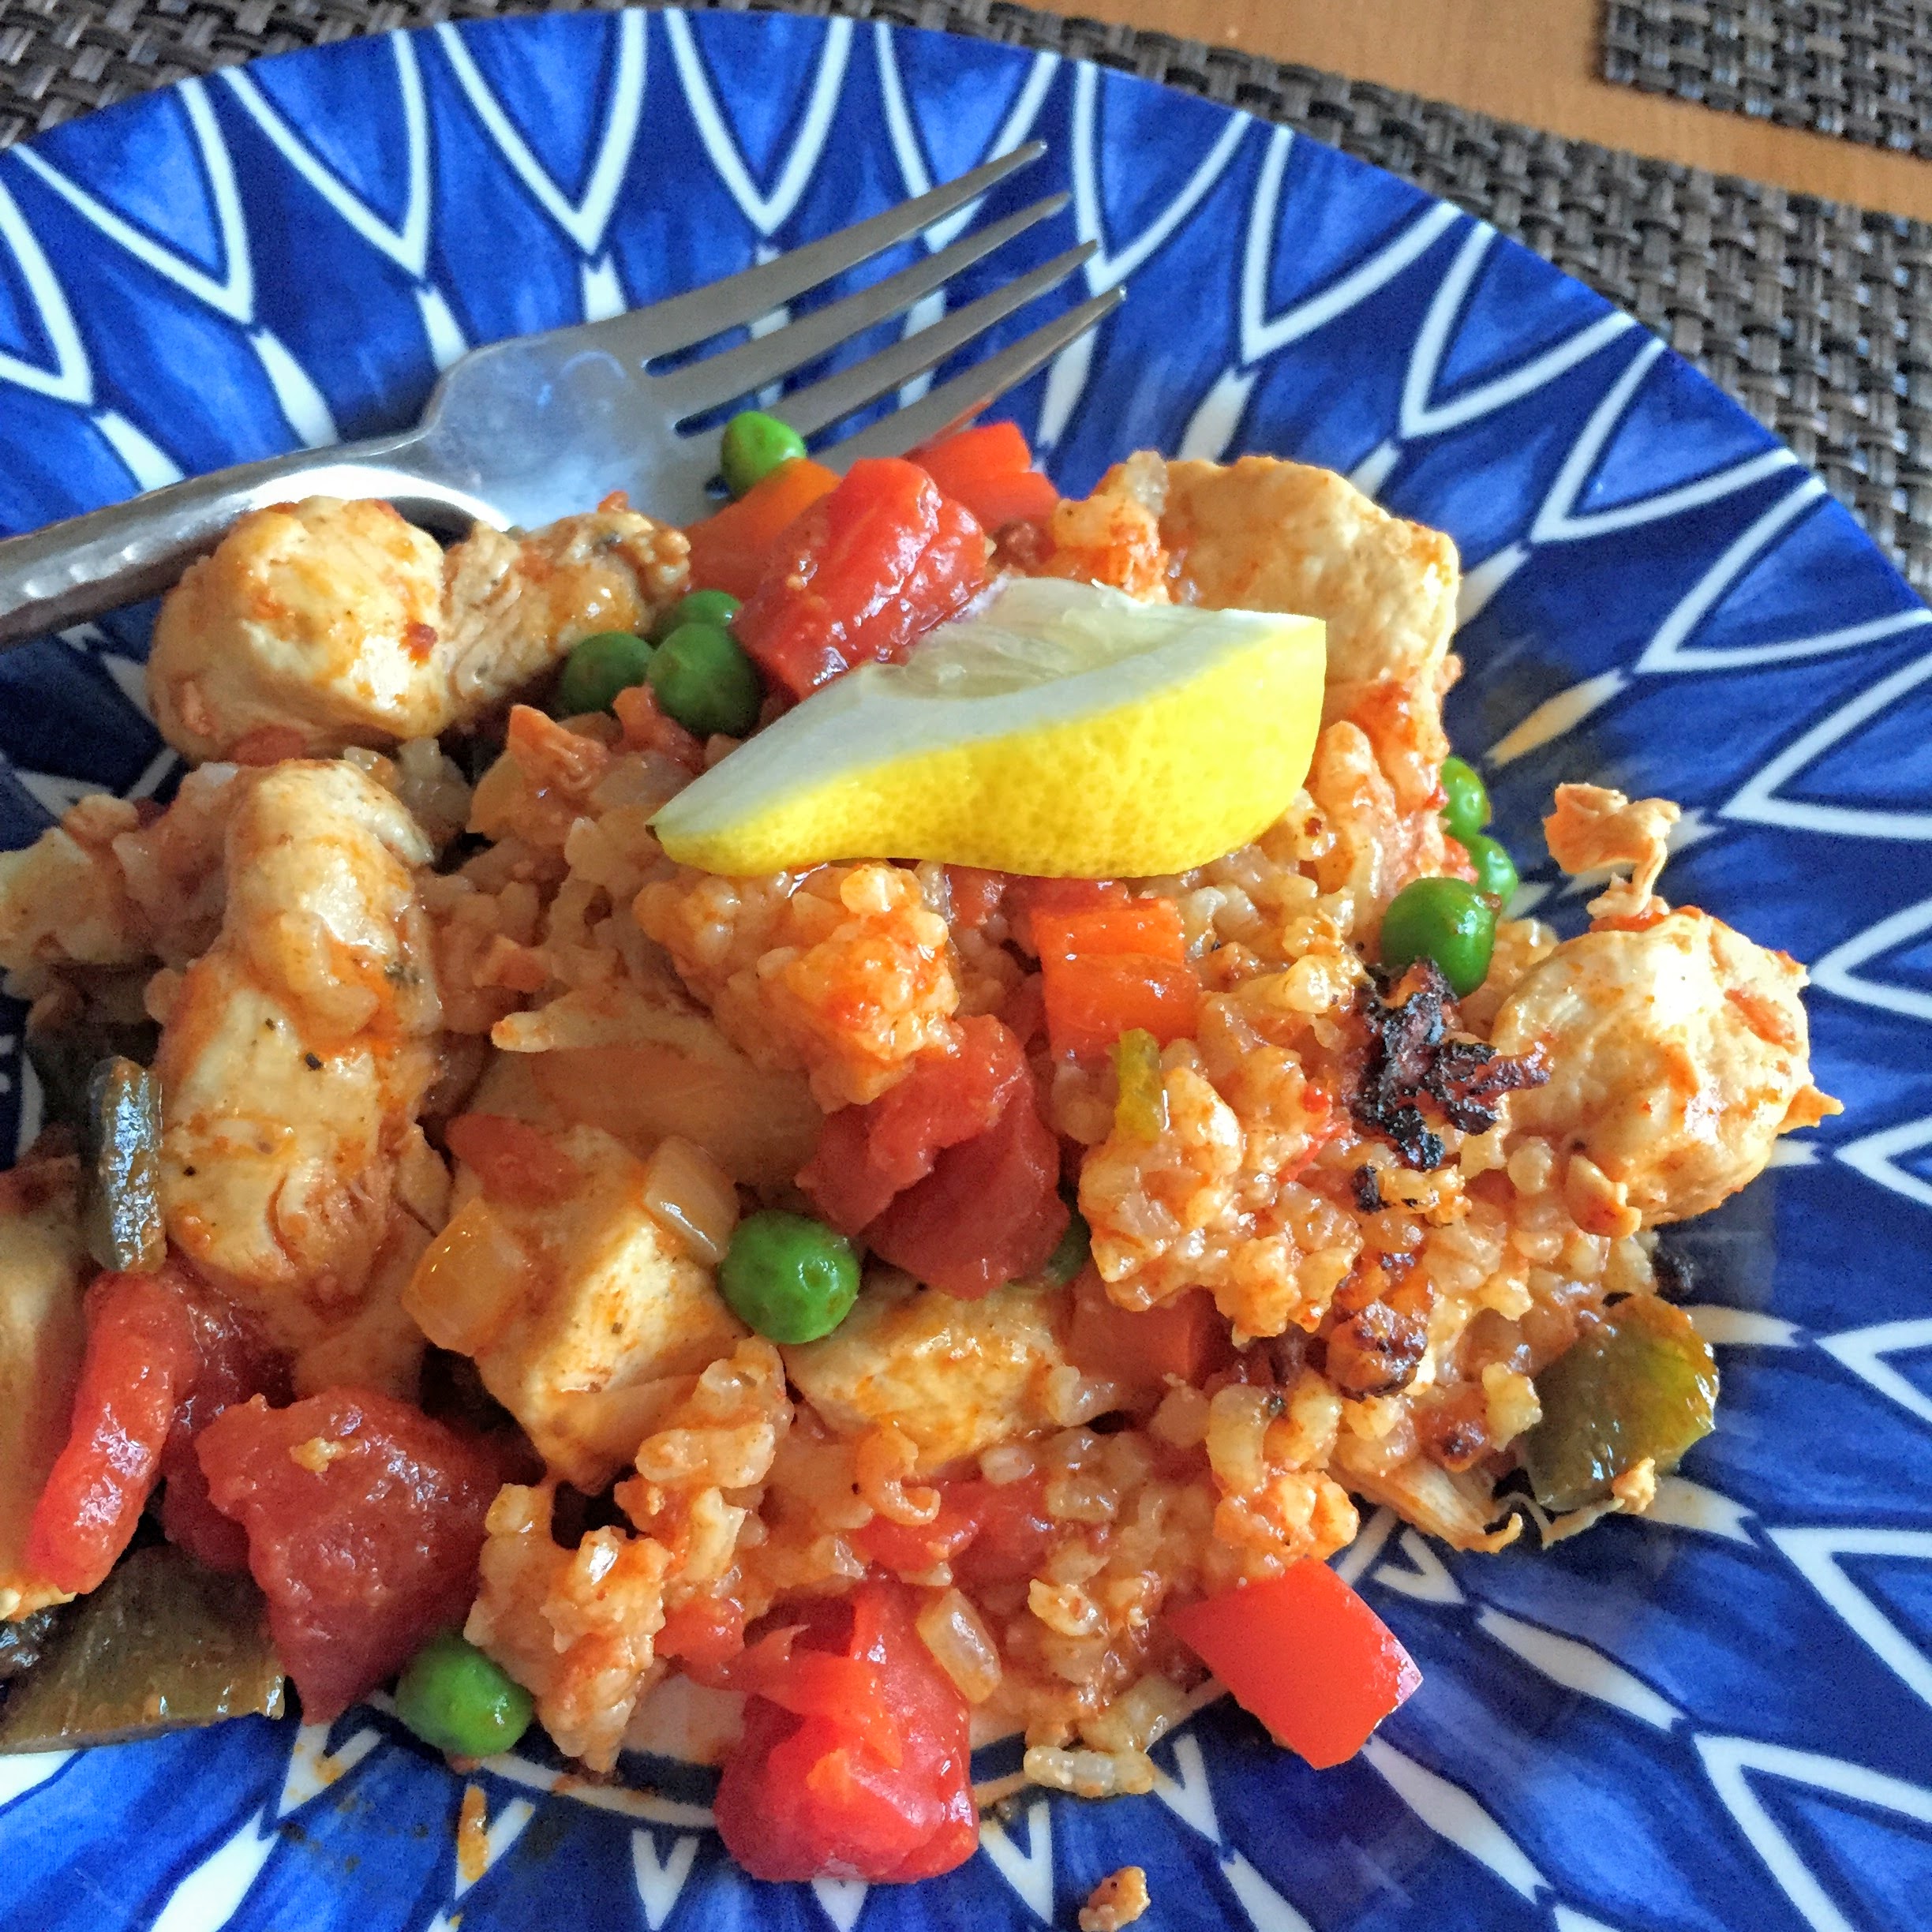
Good paella, in my unlearned opinion, comes down to three things.  First, there should be a bonanza of textures: you want soft onions and peppers, tender proteins, and crispy, crunchy rice (known as socarrat) from the bottom and sides of the pan.  Second, there ought to be clean, bright flavors like lemon and sweet peas to balance the rich earthiness of the paprika and chorizo.  Third, flavor need to permeate the dish.  Some restaurant paellas have these sad layers, in which the flavor sits in the rice but fails to reach any of the proteins or vegetables. Can't have that. This paella, in my view, achieves all three goals.

It does so with one sacrifice: there's no seafood in this recipe. Some will argue that it is not, therefore, a paella; I say to each his own. The reason I omit shrimp, clams, fish, or other likely suspects is the difficulty of achieving well-cooked seafood that nevertheless carries with it any meaningful flavor from the dish. That said, feel free to modify this recipe by adding well-cooked and seasoned seafood upon serving.

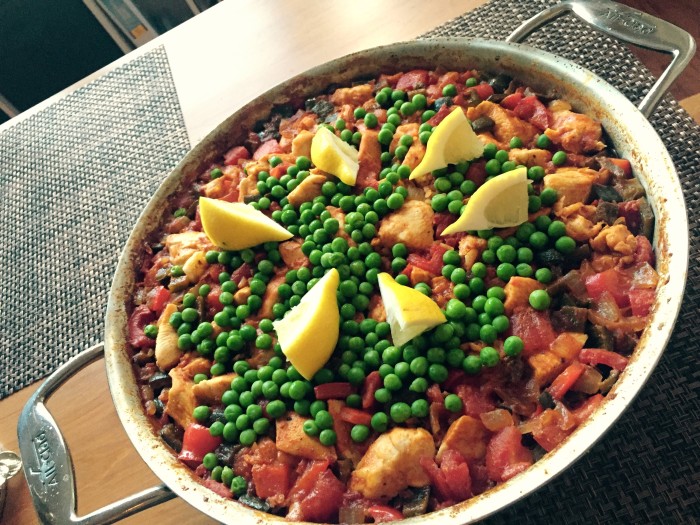
The other elevating feature of this recipe is the non-traditional addition of poblano peppers in lieu of green bell peppers. Poblanos (which I've learned are merely less ripe ancho peppers) add a nice heat, ramping up the bite of the paprika and chorizo without overpowering the more subtle flavors from the onion and red bell pepper. They're also a beautiful dark green that plays nicely against the reds and oranges in the final dish. I used two; poblanos are reasonably mild and I did want a solid capsaicin kick.

And so, without further ado: 

Spicy Chicken & Chorizo Paella with Poblanos

Serves 6-8 

Approximately 1 hour

Special equipment: paella pan or a wide, shallow skillet, at least 4 quarts.

A NOTE ON CHORIZO: I've made paella with pre-cooked, Spanish chorizo and raw, Mexican style chorizo, and either is excellent. The outcome is slightly different--Spanish chorizo lends less flavor to the other ingredients but leaves you with little morsels, adding texture to the final dish, while Mexican chorizo will really infuse everything else with the fats and spices in the sausage. Both make declicious paella. Note that when you add the chorizo will change depending on the chosen chorizo. (Which would be a great name for a band).

  • Olive oil
  • 2 1/2 lbs. boneless skinless breasts, cut into bite-sized pieces
  • Salt
  • Freshly ground black pepper
  • 2 teaspoons paprika
  • 1 large onion, diced
  • 2 poblano peppers, diced
  • 1 large red pepper
  • 1 (14.5-ounce) can diced tomatoes
  • 4 cups chicken broth
  • 1 pound chorizo (see note above), diced if using Spanish style.
  • 2 cups short- or medium- grain white rice, rinsed thoroughly
  • Pinch saffron threads
  • 1 cup frozen green peas
  • Lemon wedges, for service
  1. Heat two tablespoons of olive oil over medium-high heat until it begins to shimmer. Working in batches, add the chicken, season with salt and pepper, and cook, stirring occasionally, until cooked through and browning nicely. Remove from pan and pour out any excess liquid
  2. Add a tablespoon of olive oil and saute the onions and peppers until softened, about three minutes. If you are using Mexican chorizo, add it now and cook another three minutes, stirring and breaking up the meat. (Don't worry if things start to stick to the bottom of the pan). I like to use a wooden spoon.
  3. Stir in the diced tomatoes, paprika, and Spanish chorizo (if using). Saute thirty seconds, stirring constantly, then add the chicken stock. Stir the mixture thoroughly, scraping up any burned bits on the bottom of the pan.
  4. Bring the liquid to a boil and then stir in the rice and saffron. Add the browned chicken pieces and stir to incorporate completely. (The rice should be completely covered with liquid; if it's not, add a little stock or water). Cook the paella, uncovered without stirring for 20-25 minutes, or until the rice is has absorbed most of the liquid.
  5. Remove the paella from the heat and scatter the top with the frozen peas. Cover and allow to sit for 5 minutes.
  6. Serve with ample lemon wedges and, if desired, your seafood of choice.


That's all! Makes GREAT leftovers, too. Bon appetit and b'teavon!

Saturday
Feb282015

Honey & Sesame Challah


Shabbat Shalom, eaters! Today (well, actually yesterday) we bake(d) an iconic, delicious, impressive loaf: Challah! And as intimidating as it may seem, you can too. That's because challah is actually a very simple bread that can tolerate more than a little error or variability in its production. If you've ever wanted to start baking bread, challah is a wonderful place to begin. 

Let's take a step back. I think baking makes a lot of people nervous, and baking bread can be downright intimidating. Perhaps it's all those people wandering around declaring that "cooking is art and baking is science."

That's just not true. It's all science--it's all chemical reactions and combinations--but it's also all "art"--cooking and baking both take some practice and experience. Above all else, you've just got to be willing to fail sometimes. Learning is hard! Practice includes failure! And making bread is no exception.

But! (And this is a good "but.") 

With good recipes, a good attitude, and little patience, you can and will succeed. So without anymore morale-boosting:

Basic Challah
Adapted from Smitten Kitchen
Makes two large loaves
Approx. 3.5 Hours minimum, start to finish

Ingredients:

  • 3 3/4 teaspoons active dry yeast (about 1 1/2 of the little packages or 3/8 ounces). Don't stress too much about exactitude here; just do your best.
  • 1 tablespoon granulated sugar
  • 1 3/4 cups water at about 110 degrees Fahrenheit, which is warm but not so warm that it hurts to hold your hand in the water. If you have a thermometer, use a glass measuring cup and "dial it in" by starting too hot and adding cold water and stirring until it hits about 110, +/- 5 degrees. If you prefer celsius--good for you for living in a sensible country. 
  • 1/2 cup olive, vegetable, or canola oil
  • 5 large eggs
  • 1/2 cup honey (Any kind of pure honey; the stuff you get at the grocery or convenience store is fine. Creamed or whipped honey is not ideal. If your honey has crystalized and become grainy, let the closed jar sit in hot water for fifteen minutes.)
  • 1 tablespoon table salt (if you're using a salt with large grains, increase the amount slightly)
  • 8 to 8 1/2 cups all-purpose flour (it helps a lot to pre measure the flour and put it in a bowl off to the side to avoid losing count)
  • Cooking spray (olive oil or canola is ideal; if you don't have spray you can just use more oil)
  • Sesame seeds for topping (a few tablespoons)

1. PROOFING the yeast: In a large bowl (or right in the measuring cup), whisk the yeast and the 1 tablespoon sugar in the warm water. Wait 5-10 minutes until it gets foamy like a capuccino and smells strongly of bread or hefeweizen. (It's called proofing because you're getting "proof" that the yeast is still alive and active. If the yeast doesn't foam, try gain with new yeast.)

2. If you're not already working in a big bowl, transfer to one. Whisk the oil into yeast, then beat in 4 eggs with the honey and salt.

3. Gradually add flour, a cup or so at a time. Start by mixing with a sturdy spoon (wood is good). After a few cups, spoon mixing will be tough; switch to using your hands. When the dough is starting to get firm, after about 7 1/2 cups or so, you're going to start kneading. I would do this by hand; Smitten Kitchen says (and I believe her) that this is too much dough for your average home stand mixer.

4. KNEADING:

a. Lightly flour a clean surface like a counter or a big, unsmelly cutting board (unsmelly is key; do you want your challah tasting like onion? Maybe you do.). To do this, take a handful of flour and sprinkle it onto your work surface. Then use your hands to spread it around.

b. Transfer the dough to the floured surface, making sure to get up all the scraps at the bottom. Knead by folding the dough in half, then using the heel of your hand to squish the halves together. Here's a video in case you want a crash course.

c. If the dough gets very sticky, sprinkle on more flour. You may need to re-flour your work surface a few more times.

d. Knead for about five to ten minutes, or until your arms give out. The goal is for the dough to be much less sticky, a little springy, and "smooth" (in the sense that there are no more pockets of unblended flour).

e. When you're done, shape the dough into a ball

5. FIRST RISE (1 hour): Clean out your big bowl bowl and grease it with the cooking spray, then place the dough ball in the bottom. Cover with plastic wrap, and let rise in a warm place for 1 hour, until almost doubled in size. The dough may also rise in an oven that has been warmed to 150 degrees then turned off.

6. SECOND RISE (30 minutes): Punch down the dough, cover it, and let it rise again in your warm place for another thirty minutes.

7. BRAIDING: This can be tough. Follow my directions, if you screw it up it's fine to start over, and trust me--it doesn't need to look perfect that this point.

 a. Turn the dough out onto the counter. It will collapse a good deal--that's ok. Spray some oil on a knife and cut the dough in half. Each half will make one loaf.

b. Take the first half and cut it into six equal-ish chunks. I find this easiest by cutting the half in half again, then into thirds. If the chunks are not perfectly equal, that's not the end of the world--just do your best.

c. Roll each chunk into a snake. I start but rolling it between my hands in the air, then finish by rolling it against the counter. IDEALLY each snake should be about 16 inches long and taper a little so it's fatter toward the middle. Again, just do your best.

d. Fan out the snakes and pinch them together at one end.

e. Working ALWAYS from the RIGHT, go OVER TWO, UNDER ONE, OVER TWO, UNDER ONE.

f. Continue. You may have to rotate the growing loaf around a bit.

g. When you run out of a strand, pinch the ends together well and firmly.

h. Using a dough scraper or a knife, cut off each end so it looks pretty. Don't worry! You'll use that dough to make a little roll.

i. Take the ends, combine them, and roll it into a tapered piece. Then, twist the little tail around the big end to make a little turban-style roll.

j. You did it! Now do it again with the other half of the dough.

k. If you need help, or want to try a different braid, check this page out.

8. THIRD RISE (30 minutes): Preheat oven to 375 degrees Fahrenheit. Place the loaves on parchment on top of a pan. Beat remaining egg and brush half on the loaves--you can use your hands, or a pastry brush. Place a piece of plastic wrap on top of the each loaf (and the mini rolls) and let rise one last time.

9. Paint the loaves (and the rolls) with the rest of the egg wash, then sprinkle heavily with sesame seeds.

10. BAKING: Bake the loaves, preferably one at a time, in the middle of the oven for about 25 minutes until golden. If you go one at a time, you can use loaf number one as a guinea pig to get the time right for loaf number two. Let them cool on a rack.

Et voila! You have awe-inspiring challah that will impress the pants off your friends, family, in-laws--whomever!

Bon appetit, b'teavon, and stay hungry!  

PS: When you're done eating the bread fresh, how about making some Vanilla Chai French Toast?!?

Wednesday
Feb182015

I still cook. A Lot.

Clockwise from top left: Valentines Day treats, including homemade labneh; awesome barbeque from Pappy's in Houston; baked steel-cut oatmeal with apples, figs, and chai spices; and homemade olive-rosemary bread.

Cooking isn't a hobby; it is a passion. I don't cook merely out of idleness or hunger or the desire to master a new skill, although these all play a role. I cook because I love it. I love making something new and coaxing interesting flavors and meals out of disparate ingredients, and I cook because I love the people I cook for. 

I haven't posted in about eighteen months. It's not because I don't still cook: I do, every day. I make eggs, generally scrambled, often with onions and garlic and herbs and cheese, just about every morning. I cook dinner--a full, complete meal (with sides!)--three or four times a week. I've explored bread and have developed strong go-to bread recipes. I still scour the food blogs and Food & Wine and Bon Appetit magazines for inspiration, and I always tweak recipes to strengthen and deepen flavors or change them altogether. I still cook--a lot.

So why did I stop blogging?

Because cooking is my passion; blogging isn't. It never was. I began blogging in 2010 to fill idle hours and squeeze even more fun out of my cooking adventures. Now idle hours dwindle and will dwindle further once I graduate law school in May, begin studying for the bar, and (hopefully) become an attorney. 

But I miss writing about food. I miss describing exciting meals and sharing my excitement when I discover or play with a new recipe.

So I'm going to take Hungry Sam out of the freezer, let her thaw, and start posting whenever I feel like it. This won't be regular, but I promise that if you, dear reader(s?), click through, you will share in the fun and get some great, simple, flavorful recipes and cooking ideas.

Welcome home, bon appetit, and b'teavon! 

P.S. The olive-rosemary bread is based on this recipe from Williams Sonoma (I reduced the salt by half, tripled the roasemary, and top the bread with flaky sea salt and rosemary sprigs, and I always bake the loaf in a dutch oven to get a great chewy crust. I'll post about this one soon, I think.

P.P.S. The labneh is easy: drain full fat greek yogurt in cheesecloth and a seive over a bowl in the fridge for 2 days. Stir in salt, top with za'atar (Israeli spice blend) or with thyme and sesame seeds.

P.P.S. The oatmeal is based loosely on this recipe. I think I added ginger and switched half the dates for dried figs; I also topped the dish with apple slices as figs were out of season.

Thursday
Aug082013

Make it Yourself: Wicked Lemony Hummus

If you're like me, you spend altogether too much money on store-bought hummus. You shell out your hard-earned dollars for often-mediocre tubs of the stuff, or perhaps if you're feeling flush you pick up some delicious Sabra.

There is, however, a better way. That way is homemade. 

BEHOLD: Tasty, savory, easy, and inexpensive Lemon Sesame Hummus

The key to this recipe, as for all hummus, is the tahini. Tahini is nothing more complex or exotic than a paste made from ground, hulled sesame seeds, yet it is a critical component of all hummus recipes. It adds a rich depth of flavor and undergirds the creamy consistency so prized in excellent hummus. When one tastes a "hummus" that, despite its pretensions, tastes merely like ground up chickpeas, the missing piece is nearly always tahini.

For my thrifty readers: Tahini is a tad pricey but stretches far; each batch of hummus, for example, only requires about two heaping tablespoons. The sum of the remaining ingredients in the recipe below might reach as high as two dollars.

Finally, I warn you--this is a wicked lemony hummus. Feel free to crank things back as you see fit. You're the chef!

Click through for the recipe!

Click to read more ...

Sunday
Feb172013

NEW RECIPE! Smoky Black Bean & Bacon Stew with Avocado and Fried Egg

It's hard not to enjoy black bean soup. It's rich and dark, a perfect cold-weather recipe, and virtuous too--both calorically and financially. Black bean soup is a simple classic, and should therefore not be tweaked, added to, or substantially changed.

Or, instead, we could do all of those things! We could seek to improve black bean soup--nay, perfect it. 

"Perfect it?!?!" you gasp. "But how?"

"With bacon," I say. "With bacon."

Yes, dear friends, dear readers: We can make our black bean soup with bacon. Then, we can play off the rich bacon with smoky chipotle and sweet garlic and let the soup slowly cook down into a thick, hearty stew. We can load up the toppings: sour cream to offset the smoke and heat; fried egg for protein; avocado for healthy fats and texture. Finally we can serve the whole mess with the afterthought of some greenery: a little chopped scallion to make it look as though we went to trouble (we didn't, of course; the whole thing was quite easy).

Et voilà--a delicious, dark, filling meal, served in a single bowl. (Recipe after the jump!)

Click to read more ...

Friday
Nov302012

Farewell, Everyday Food

Today is a sad day at Hungry Sam. Everyday Food magazine--the small monthly full of cooking tips, recipe ideas, and quick and cheap but gourmet meals--is no more.

One of my several Everyday Food-inspired recipes

Yes, some exec at Martha Stewart Living Omnimedia (I'll just refer to this person as "Brutus" from here on out) hath stabb'd my poor sweet inspiration. I almost feel as it were doomsday.

I'm genuinely bummed. I can only hope THIS Brutus has some measure of the regret his predecessor felt (no running into swords, though, please).

I will say the last issue looks awesome--quite the swan song--so I'd encourage you to pick up a copy if you see it at grocery store checkout aisles. Just a preview of some of the great recipes in the last edition: Homemade Marinara five ways; non-deep-fried Sweet and Sour Chicken; and Chicken and Artichoke Lasagna. All with pretty pictures.

(Also, I promise they've never given me anything--this is just love and respect for a nice, unpretentious little magazine.)

Anyways, for the Hungry Sam tribute to the sweet demise of this fun magazine, here's a list of a few of my recipes and posts that were at least inspired by Everyday Food:

Spanish Paprika Turkey Meatloaf

Pineapple and Ginger-Infused Rum

Mustard and Caper Pan-Seared Salmon

Homemade Crepes

Lemon-Nutmeg Acorn Squash (my only vegan recipe!)

Coffee and Chili-Rubbed Skirt Steak

Tomato and Fresh Oregano Skillet Chicken (an early post; please excuse, well, everything)


Monday
Nov122012

What is a Chicken? Or, Things I'm learning in Law School

As I expected, law school entails wrestling with many weighty issues of Great Importance--questions that shed light on American values and on the very foundations of our legal rights.

Questions like, "What is a chicken?"

Image via Allie's.Dad, Creative Commons licensed. Some rights reserved.

Yes. A case I read for Contracts last week turned on whether, in a particular contract for the sale of frozen chickens, "chicken" meant "any bird of that genus . . . including stewing chickens" or, more narrowly, young roasting chickens. See Frigaliment Importing Co. v. B.N.S. Int'l Sales Corp., 190 F. Supp. 116, 117 (S.D.N.Y. 1960) (holding plaintiff failed to prove the contract was for young chickens--I won't bore my non-lawyer audience with the somewhat involved rationale).*

But here's a question suitable for this blog: Why does the age of the chicken matter? Or, put differently, what's the difference between a young chicken (suitable for roasting, broiling, frying, baking, etc.) and an older chicken (good for stewing and braising)?

The answer, as I understand it,** lies in the fact that absent texture-altering prep techniques (like using marinades or brining), meat from older animals is much more likely to become tough when cooked at the high temperatures associated with roasting, broiling, frying, and baking. As an animal ages, the number of contractile protein fibrils inside each of its muscle fiber increases, making the fibers stronger and thicker. Because cooking makes muscle fibers dry and dense, denser muscle fibers will more readily squeeze out liquid, resulting in tougher cooked meat. This issue is exacerbated by the fact older birds have more connective tissue (particularly collagen) and less marbling fat to keep things tender and juicy.

Here's where it gets cool. You can slow-cook older chicken meat in liquid without it getting tough and dry, both because the meat reabsorbs liquid from the stew or braising medium and because the lower temperatures assists in the breakdown of tough collagen into soft gelatin.

As an example, one traditional French method for cooking old birds is Coq Au Vin--chicken in wine. You can find any number of variations, but here's a link to Julia Child's recipe for a Bourgogne-style Coq Au Vin.

Enjoy!


*DISCLAIMER: This post is in no way intended to be helpful to anyone attempting to understand or brief Frigaliment Importing Co. v. B.N.S. International Sales Corp. For that, I'd whole-heartedly recommend listening to this song. (Further incentive: there are banjoes!) 

**All the cool cooking science here comes from this tome of food science, On Food and Cooking: The Science and Lore of the Kitchen by Harold McGee (external link).