Related Posts Plugin for WordPress, Blogger...

Entries in breakfast (20)

Saturday
Feb282015

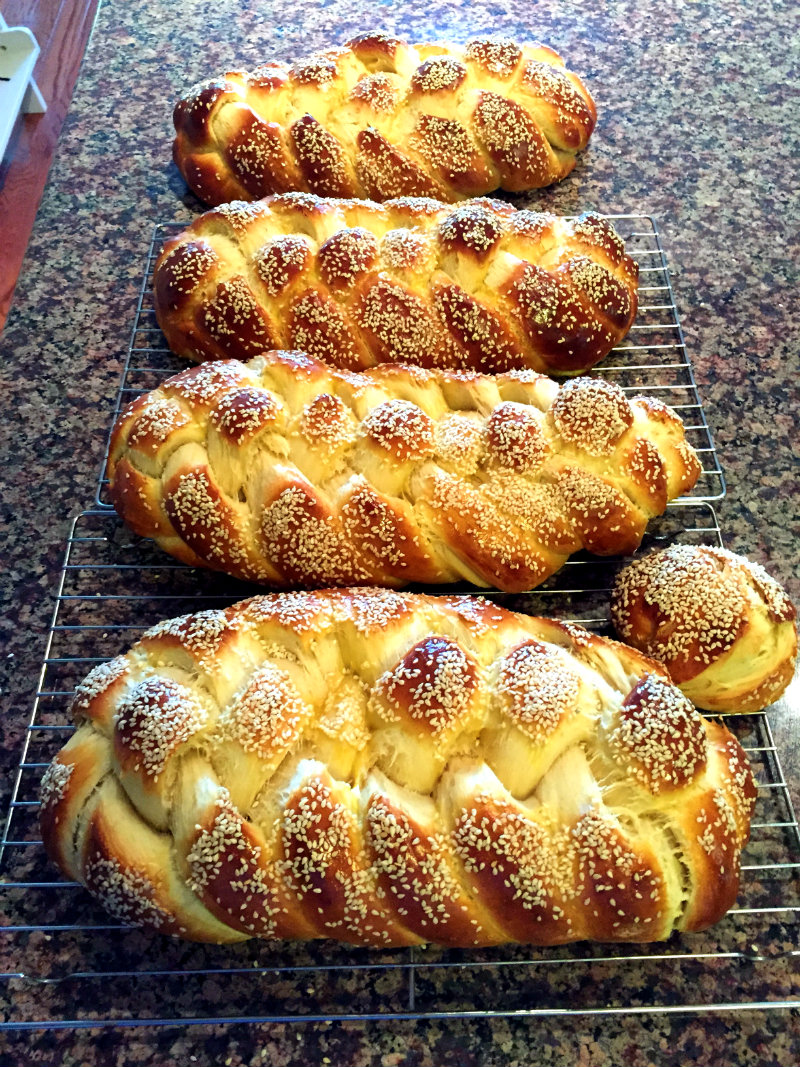
Honey & Sesame Challah


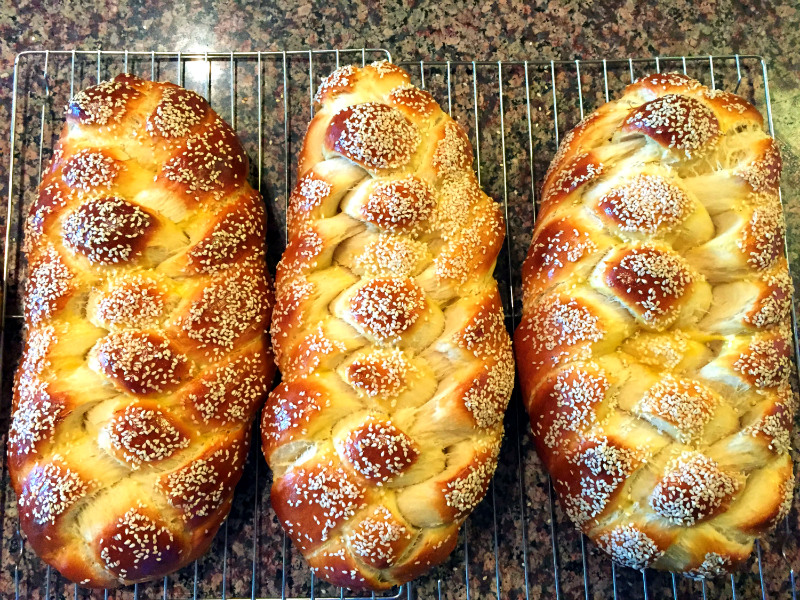
Shabbat Shalom, eaters! Today (well, actually yesterday) we bake(d) an iconic, delicious, impressive loaf: Challah! And as intimidating as it may seem, you can too. That's because challah is actually a very simple bread that can tolerate more than a little error or variability in its production. If you've ever wanted to start baking bread, challah is a wonderful place to begin. 

Let's take a step back. I think baking makes a lot of people nervous, and baking bread can be downright intimidating. Perhaps it's all those people wandering around declaring that "cooking is art and baking is science."

That's just not true. It's all science--it's all chemical reactions and combinations--but it's also all "art"--cooking and baking both take some practice and experience. Above all else, you've just got to be willing to fail sometimes. Learning is hard! Practice includes failure! And making bread is no exception.

But! (And this is a good "but.") 

With good recipes, a good attitude, and little patience, you can and will succeed. So without anymore morale-boosting:

Basic Challah
Adapted from Smitten Kitchen
Makes two large loaves
Approx. 3.5 Hours minimum, start to finish

Ingredients:

  • 3 3/4 teaspoons active dry yeast (about 1 1/2 of the little packages or 3/8 ounces). Don't stress too much about exactitude here; just do your best.
  • 1 tablespoon granulated sugar
  • 1 3/4 cups water at about 110 degrees Fahrenheit, which is warm but not so warm that it hurts to hold your hand in the water. If you have a thermometer, use a glass measuring cup and "dial it in" by starting too hot and adding cold water and stirring until it hits about 110, +/- 5 degrees. If you prefer celsius--good for you for living in a sensible country. 
  • 1/2 cup olive, vegetable, or canola oil
  • 5 large eggs
  • 1/2 cup honey (Any kind of pure honey; the stuff you get at the grocery or convenience store is fine. Creamed or whipped honey is not ideal. If your honey has crystalized and become grainy, let the closed jar sit in hot water for fifteen minutes.)
  • 1 tablespoon table salt (if you're using a salt with large grains, increase the amount slightly)
  • 8 to 8 1/2 cups all-purpose flour (it helps a lot to pre measure the flour and put it in a bowl off to the side to avoid losing count)
  • Cooking spray (olive oil or canola is ideal; if you don't have spray you can just use more oil)
  • Sesame seeds for topping (a few tablespoons)

1. PROOFING the yeast: In a large bowl (or right in the measuring cup), whisk the yeast and the 1 tablespoon sugar in the warm water. Wait 5-10 minutes until it gets foamy like a capuccino and smells strongly of bread or hefeweizen. (It's called proofing because you're getting "proof" that the yeast is still alive and active. If the yeast doesn't foam, try gain with new yeast.)

2. If you're not already working in a big bowl, transfer to one. Whisk the oil into yeast, then beat in 4 eggs with the honey and salt.

3. Gradually add flour, a cup or so at a time. Start by mixing with a sturdy spoon (wood is good). After a few cups, spoon mixing will be tough; switch to using your hands. When the dough is starting to get firm, after about 7 1/2 cups or so, you're going to start kneading. I would do this by hand; Smitten Kitchen says (and I believe her) that this is too much dough for your average home stand mixer.

4. KNEADING:

a. Lightly flour a clean surface like a counter or a big, unsmelly cutting board (unsmelly is key; do you want your challah tasting like onion? Maybe you do.). To do this, take a handful of flour and sprinkle it onto your work surface. Then use your hands to spread it around.

b. Transfer the dough to the floured surface, making sure to get up all the scraps at the bottom. Knead by folding the dough in half, then using the heel of your hand to squish the halves together. Here's a video in case you want a crash course.

c. If the dough gets very sticky, sprinkle on more flour. You may need to re-flour your work surface a few more times.

d. Knead for about five to ten minutes, or until your arms give out. The goal is for the dough to be much less sticky, a little springy, and "smooth" (in the sense that there are no more pockets of unblended flour).

e. When you're done, shape the dough into a ball

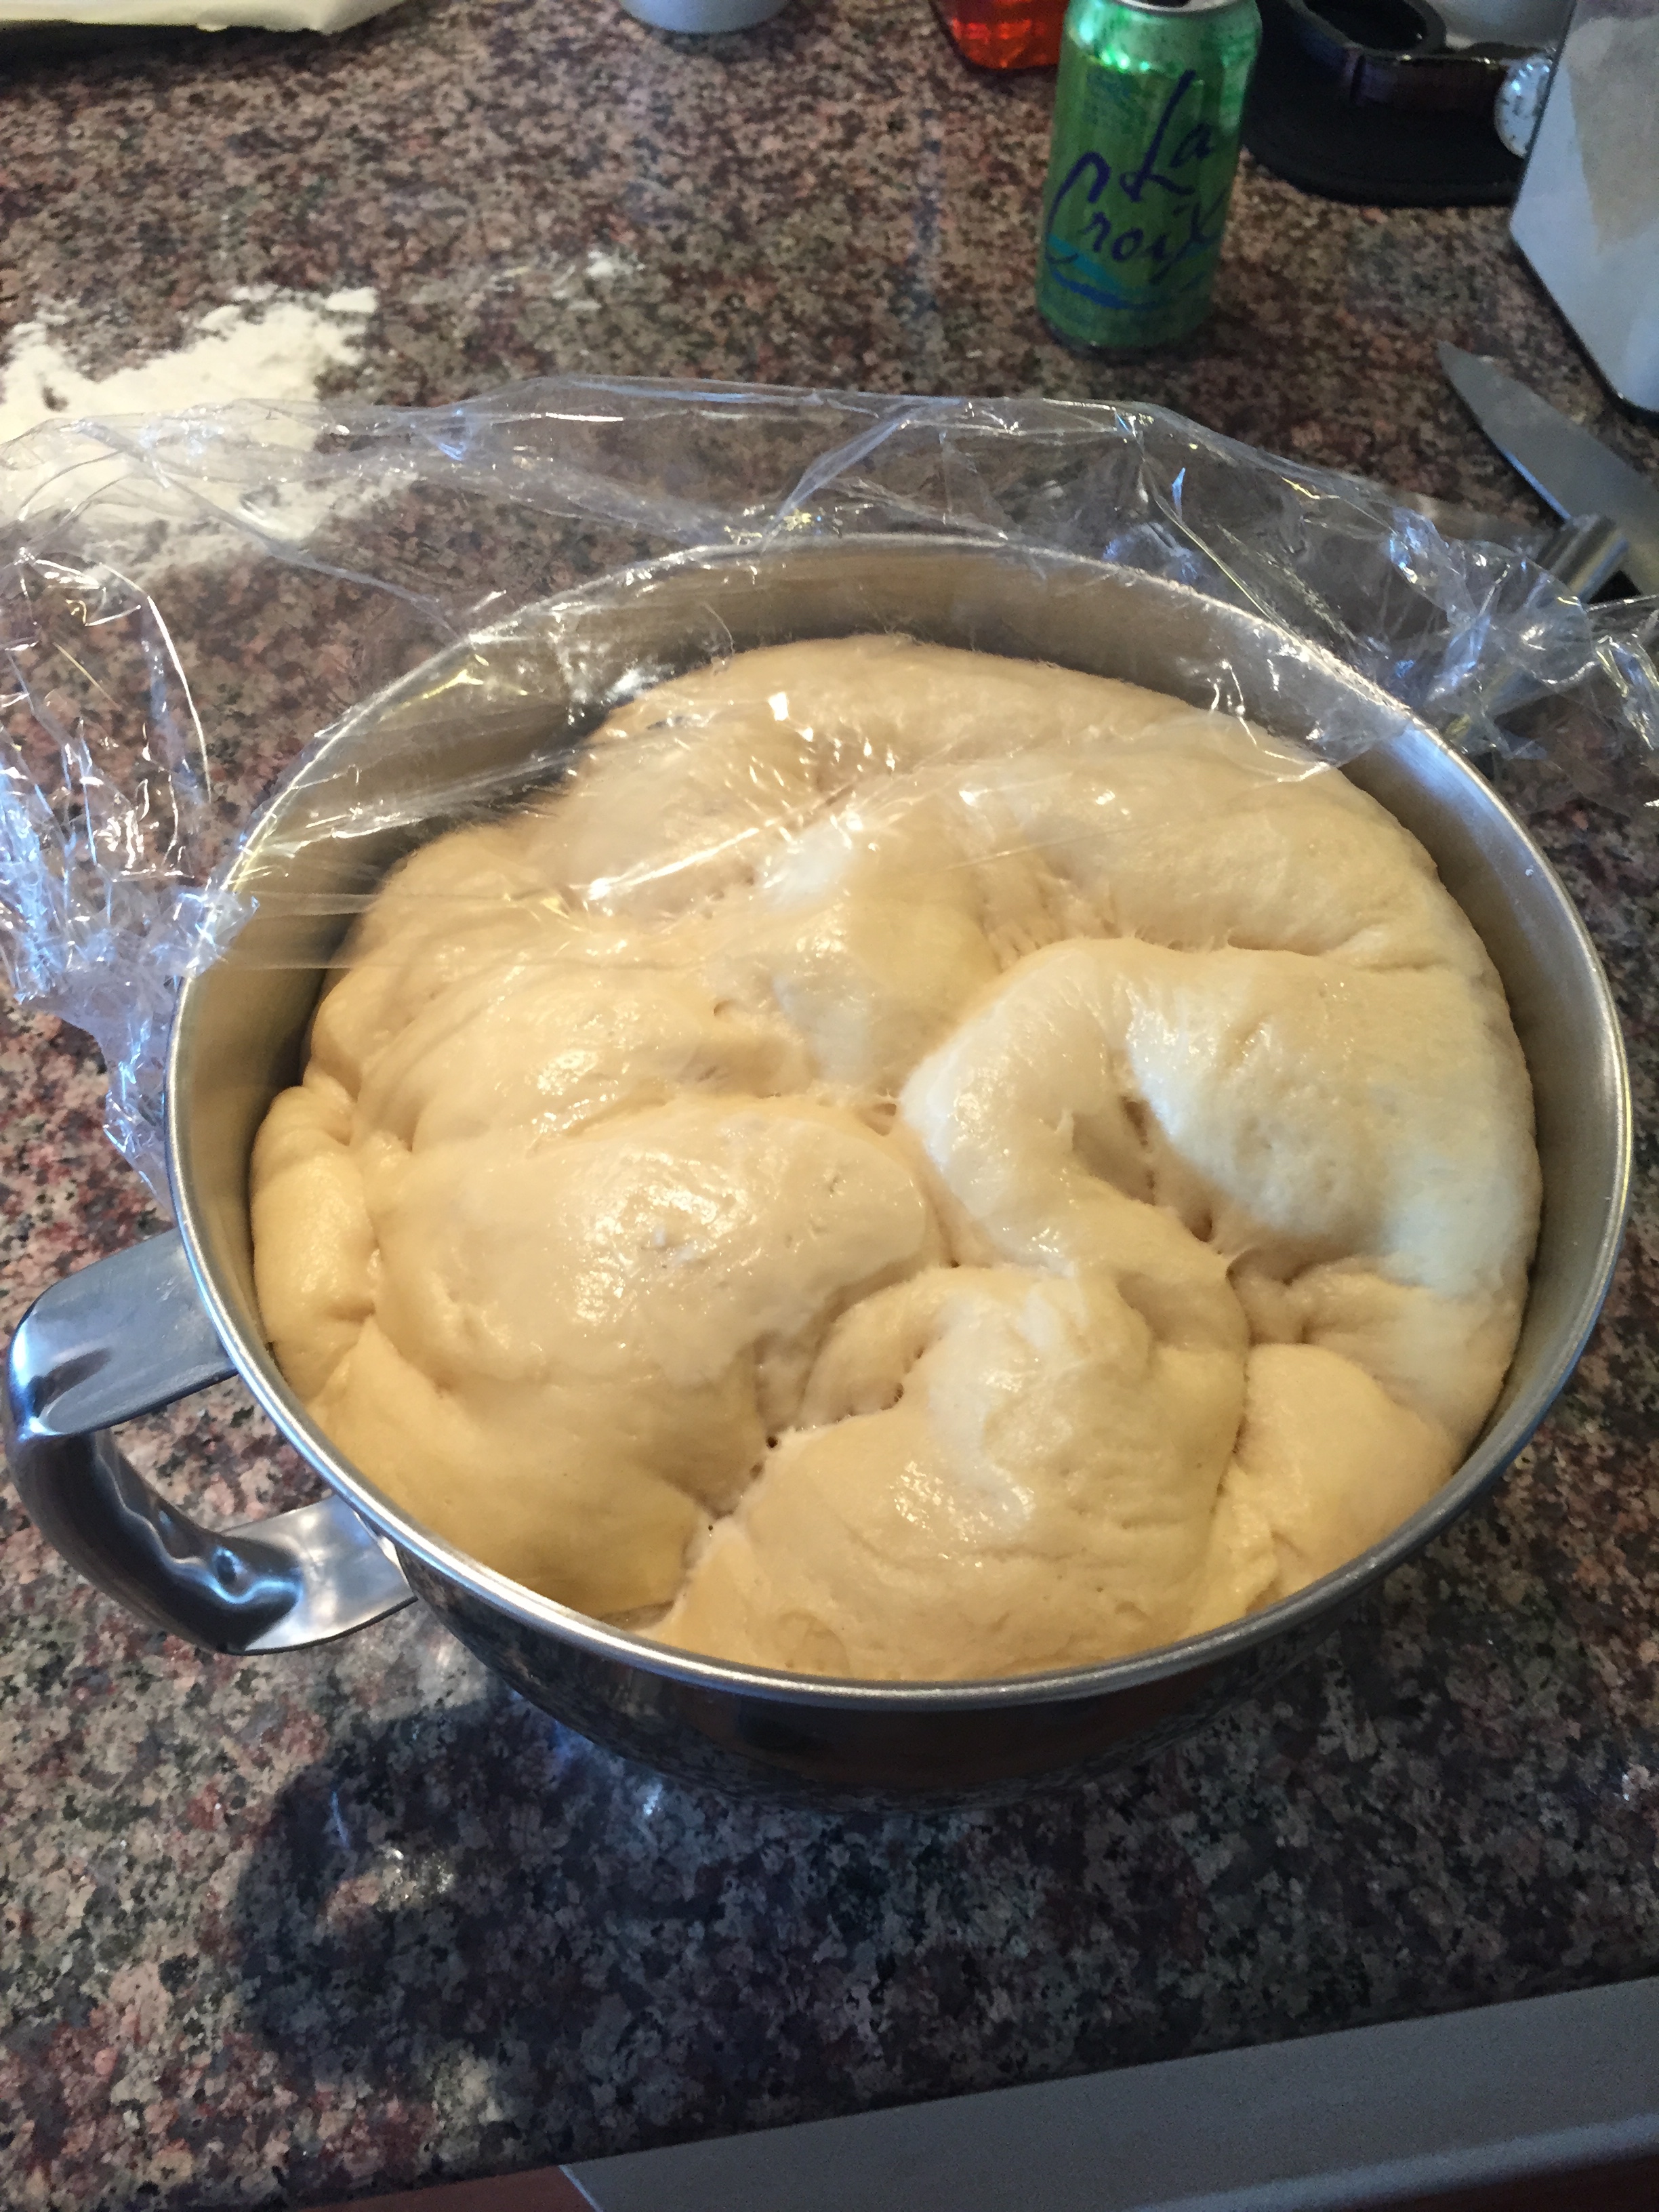
5. FIRST RISE (1 hour): Clean out your big bowl bowl and grease it with the cooking spray, then place the dough ball in the bottom. Cover with plastic wrap, and let rise in a warm place for 1 hour, until almost doubled in size. The dough may also rise in an oven that has been warmed to 150 degrees then turned off.

6. SECOND RISE (30 minutes): Punch down the dough, cover it, and let it rise again in your warm place for another thirty minutes.

7. BRAIDING: This can be tough. Follow my directions, if you screw it up it's fine to start over, and trust me--it doesn't need to look perfect that this point.

 a. Turn the dough out onto the counter. It will collapse a good deal--that's ok. Spray some oil on a knife and cut the dough in half. Each half will make one loaf.

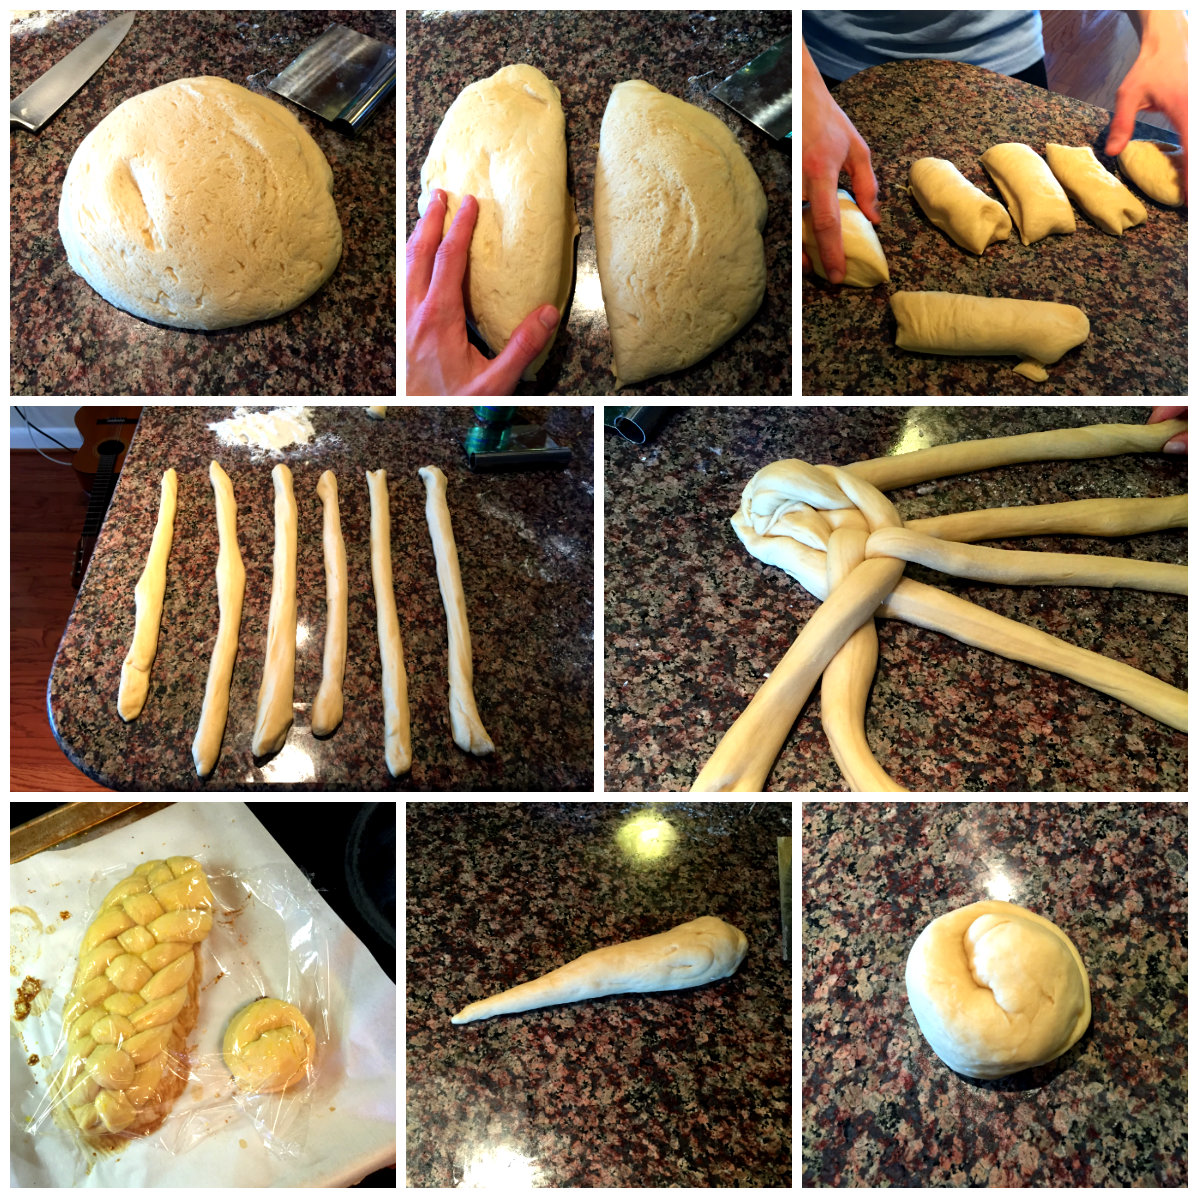
b. Take the first half and cut it into six equal-ish chunks. I find this easiest by cutting the half in half again, then into thirds. If the chunks are not perfectly equal, that's not the end of the world--just do your best.

c. Roll each chunk into a snake. I start but rolling it between my hands in the air, then finish by rolling it against the counter. IDEALLY each snake should be about 16 inches long and taper a little so it's fatter toward the middle. Again, just do your best.

d. Fan out the snakes and pinch them together at one end.

e. Working ALWAYS from the RIGHT, go OVER TWO, UNDER ONE, OVER TWO, UNDER ONE.

f. Continue. You may have to rotate the growing loaf around a bit.

g. When you run out of a strand, pinch the ends together well and firmly.

h. Using a dough scraper or a knife, cut off each end so it looks pretty. Don't worry! You'll use that dough to make a little roll.

i. Take the ends, combine them, and roll it into a tapered piece. Then, twist the little tail around the big end to make a little turban-style roll.

j. You did it! Now do it again with the other half of the dough.

k. If you need help, or want to try a different braid, check this page out.

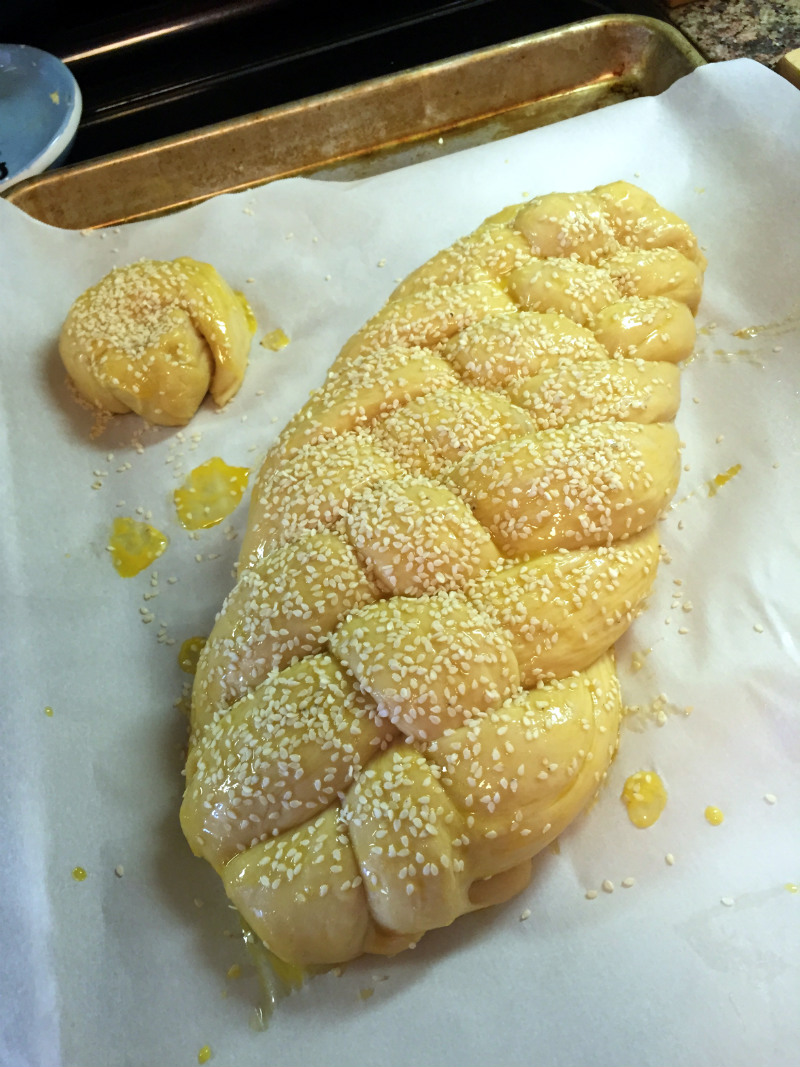
8. THIRD RISE (30 minutes): Preheat oven to 375 degrees Fahrenheit. Place the loaves on parchment on top of a pan. Beat remaining egg and brush half on the loaves--you can use your hands, or a pastry brush. Place a piece of plastic wrap on top of the each loaf (and the mini rolls) and let rise one last time.

9. Paint the loaves (and the rolls) with the rest of the egg wash, then sprinkle heavily with sesame seeds.

10. BAKING: Bake the loaves, preferably one at a time, in the middle of the oven for about 25 minutes until golden. If you go one at a time, you can use loaf number one as a guinea pig to get the time right for loaf number two. Let them cool on a rack.

Et voila! You have awe-inspiring challah that will impress the pants off your friends, family, in-laws--whomever!

Bon appetit, b'teavon, and stay hungry!  

PS: When you're done eating the bread fresh, how about making some Vanilla Chai French Toast?!?

Wednesday
Aug152012

Food in Israel: Beyond Hummus

Not long into You Don't Mess with the Zohan, the (really very funny) Adam Sandler movie about the Mossad superagent who quits to become a hairstylist in New York City, there's a great scene in which the agent's father, while mocking him for his new life plan, spoons hummus into his coffee, stirs, and drinks.

He seems to enjoy the café au garbanzo, which shouldn't surprise us, because throughout the scene we see him eating vast quantities of hummus on everything, including scooped directly from the bowl on his glasses.

This isn't far from the truth. And it's fun to tease my Israeli friends about this national cicerphilia (a word I just made up by taking the Latin word for chickpea, 'cicer' and tacking on 'philia').* What makes this so enjoyable is they often don't quite get the joke and become frustrated. They say: "What is this joke? What is this? We have more foods than just hummus!"

It's true, though. This long-winded digression (progression?) gets me to the point of the story: Food in Israel is often superb, always fresh, and more than just hummus. 

Now, to be clear, "food in Israel" is not the same as "food on Birthright" (for those unaware, Birthright is the free-of-charge trip to and tour of Israel for young Jews. I've just returned from staffing a trip). Food on Birthright is generally ok, but nothing special (it's a free trip, after all, and we're mostly eating in hotels).

But then, you hit some restaurants after Birthright (I extended my trip). Here's where the magic happens:

1) Burgers in Israel are Unbelievable

Just, unbelievable. The quality of the meat is the highest, whether because it's kosher (it is) or because the Israeli palate expects it I'm not sure. The meat is so fresh and so much effort has gone into the process that I have few concerns about ordering rare. Buns are freshly made and clearly superior. Toppings are diverse, fresh, and creative. What a treat -- when in Israel, eat a burger.

2) Try Lachuch -- If You Can Pronounce It

Lachuch isn't Israeli; it's Yemenite, which brings me to another point. I'm not sure there's such a thing as Israeli food. Instead, there's just Middle Eastern food to which all the various Middle Eastern nations lay claim, and occasionally sue one another over. Hummus, tabbouleh, baba gannouj, tahini -- it's a shared heritage that no one wants to share. Israel deals with this phenomenon by just adding the world "Israeli" or "Jerusalem" to the front of everything (e.g. "Israeli salad," "Jerusalem Pine"). 

The point! Lachuch is awesome. It looks, sort of tastes, and is cooked like a crepe, although it's leavened, it would seem. The lachuch I tried, made by an insane Orthodox Jew in Tzfat (see above; he also tried to sell me a drink he claimed was made from coca), was stuffed with a blend of fresh-grated goat's milk, sheep's milk, and cow's milk cheese with tomatoes and herbs. Pretty incredible.

More awesome stuff after the jump!**

Click to read more ...

Monday
Mar192012

The Best Brunch in All of Atlanta

I have a favorite brunch place in several cities. Visiting Portland, ME? Bintliff's is the absolute bees knees (get the corned beef hash, made with huge chunks of house-made corned beef). Swinging by Rochester, NY? Hit up Simply Crepes (and order a crepe. Duh). In Washington, DC for the weekend? I do dearly love Busboys and Poets (pretty incredible crab benedict; they call it "The Neptune").

If you live in, are stopping by or just within a couple throusand miles of Atlanta, I'd like to recommend The Best Brunch in All of Atlanta: Murphy's.

Why Murphy's? There are the basics (great service; superb coffee and espresso drinks; shafts of brilliant sunlight which shine through the open french doors; the calm breeze which meanders through and around the restaurant). Oh, you want three really, AWESOME, food-related reasons? OK:

1) SHRIMP. AND. GRITS.

Oh my God. You might think you don't like grits. I betcha you'd like them if someone were to, say, cook them in cream and cheddar cheese, cover them in a piquant tomato and andouille sausage stew, toss on a handful of giant spice-rubbed grilled shrimp, and top it all off with a perfectly poached egg and scallions for good measure.

Seriously. I have dreams about this shrimp and grits. It's what brings me back to Murphy's every time I visit Atlanta (every two months to see Jen). They're so good, I'm salivating just writing about them.

Two more reasons and a Hungry Sam Housekeeping Note after the jump!

Click to read more ...

Sunday
Jan292012

Wicked Good Berry Parfaits and Excellent, Obvious News

Before we dive headfirst into the obvious, mind-blowingly awesome news that is the epic redesign of Hungry Sam, let's take a look at this morning's deliciousness:

Wowza. This is the berry parfait of mine sweet dreams; a healthy, easy, delicious, antioxidant-packed breakfast appetizer the likes of which I've rarely made. And I can't take any credit for the recipe -- this is Lynn's, via Perri, as I understand it; I was just the assembly worker this time. (And I know what you're asking: "What's with Hungry Sam and the antioxidants?") 

(Don't ask; I have an answer, but it'll bore you.)

Perhaps the only challenge here was finding some fresh, ripe blueberries and strawberries in winter. Lynn had accomplished this already, so all I had to do to help prep for brunch this morning was layer it in, arrange the toppings, and photograph the final effect. Here it is again:

BAM. Looks good, no? Recipe below, after the jump.

Click to read more ...

Thursday
Dec292011

Vanilla Chai-Infused French Toast; or, One of the Best Ideas I've Ever Had

Friends, Readers, Countrymen/women -- I am today going to share with you one of the best ideas I ever had in the kitchen: How to make Vanilla Chai Tea-Infused French toast.

This is what happens when I cook/take pictures in a well-lit kitchen! Not bad, huh?

BUT FIRST: Did you know my friend Daphne has an awesome kosher food blog (or rather, is the food editor of a fantastic all-things-Jewish-parenting site) called Challah Crumbs? No? Well YOU DO NOW. You should a) check it out, then b) VOTE FOR Daphne/Challah Crumbs as one of the best kosher food blogs on the web!

Ok. The genesis for my vanilla chai french toast, as with so much of what I cook, may be found in my haphazard approach to dish development and my poor memory. As they say, it's better to be lucky than good -- and now and again I get to be both.

Some months back I was set on making brunch for Jen and her family, and as I was deciding what to whip up, I thought to myself, "How about that awesome thingy I ate at Open City?" which is a pretty super little restaurant/diner not far from my home in Washington. While I've only been for brunch, the place offers a large menu with a diverse array of options, including creative twists on classics -- such as their chai tea waffle.

(The adventure continues after the break!)

Click to read more ...

Wednesday
Sep212011

Shakshuka? I Hardly Know Ya!

Wow -- what a terrible title. Consider it a working title until I can come up with something better. Nope, I'm keeping it.

A long time ago, in a kitchen about eight feet away, I made a delicious dish called Shakshuka. For the sadly uninitiated, Shakshuka looks a lot like this:


Actually it looks exactly like that! Shakshuka is an Israeli breakfast dish in which eggs are essentially poached in a thick, spicy tomato-based sauce, often with a little cheese melted in, and served with pita. Much like any stew or sauce, there are myriad combinations and tweaks that a chef might bring to shakshuka to make it his or her own, but for a change of pace and because this constituted a first attempt, I stuck to a recipe. I didn't even know I could still DO that.

Except for using baguette instead of pita.

Now, for anyone who thinks Smitten Kitchen has blogging monopoly on shakshuka -- you're right. So, I worked off her recipe! It's quite easy; in fact, shakshuka falls into an excellent category of recipes I call "Looks impressive, tastes awesome, costs nothing and is super easy."

This is a super dish for brunches, because although it requires that the chef pay some attention, it's unique and will leave a lasting impression on your guests. It's heavily spiced but not overly spicy; there's rich, smoky depth of flavor, and the texture of the silky homemade sauce jives well with the egg and cheese and is perfectly complemented by crusty bread or pita. 


All you need is:
olive oil
3 jalapeños, stemmed and seeded
1 small onion, chopped
5 cloves garlic, halved
1 t. ground cumin
1 T. paprika
1 28-ounce can whole peeled tomatoes, undrained
6 eggs
1/2 cup feta cheese, crumbled
1 tablespoon chopped flat-leaf parsley


To start, dice up the onion and jalapenos (wash your hands and don't touch your eyes, people). In a heavy-bottomed pot or deep pan, cook the veggies over medium-high in a few tablespoons of olive oil until the onions turn golden, about 5 minutes. Don't cook 'em too long; you don't want them to totally break down in the sauce.

Then, add the spices and halved garlic cloves and cook another two minutes or so, being sure to coat everything in the paprika and cumin.

As a quick aside, I know some people stress about ensuring absolutely correct measurements for spices. DON'T. Unless you go totally nuts and dump in handfuls of cumin or something, you can't screw it up. If you add too much, you've just created a new version; shakshuka a la YOU.

Ok, now here's the fun part -- it's the cooking equivalent of finger painting. Dump the tomatoes out from the can, with their juices into a bowl then SQUISH THEM ALL UP WITH YOUR HANDS. That's right. With your HANDS.

"But Hungry Sam, I don't wanna use my hands," someone might say. "Isn't there an alternative?"

"NO," I say. Go big or go home, right folks?

Anyways, throw the hand-crushed tomatoes in with the onions et al, and reduce heat to medium. Simmer 12-15 minutes, stirring every few minutes and adding up to a 1/2 cup of water if things start getting dry.

Looks like the shining orb of a star!

Once things are getting kind of saucy (wink wink nudge nudge), gently -- gently! -- add your eggs, trying to get as much distance as possible between them, like so:


I'd cover the pot at this point, if you can; I feel the eggs cook more cleanly that way. After about five minutes, the yolks will be semi-firm and good to go. At this point, turn off the stove, and carefully mix in the crumbled feta. Top with chopped parsley and dig in with some sliced bread!


Thursday
Sep152011

Gratuitous Jokes about My Divorced Eggs

I'm not totally insane. I know that most of the foods and dishes I blog about wouldn't amuse a normal person as much as they amuse me.

However, the whole table at Mexican brunch (Don Jaime's in Mt. Pleasant) on Sunday found some humor in this dish:
It's called Huevos Divorciados. Yes, that's right, Spanglish speakers: I ate "divorced eggs" for breakfast.
Now, this might seem perplexing if you don't know the backstory to this sad yet delicious state of things. But I think I've pieced it together.


Warning: I'm about to take something moderately amusing way too far.

Click to read more ...